
Master Class: Designing Button Bands
- Donna Estin

- Jun 4
- 9 min read

If you’re a designer incorporating button bands into your garment, or a knitter wanting to add a button band – read on because buttonholes and bands are all about advanced planning especially if your pattern will be graded over a large number of sizes.
Your Goal: Design a functional band that lies flat without distorting the fabric, with evenly spaced buttonholes that is written out clearly in the pattern.
Stitch Pattern of Band Can be any stitch pattern that lies flat like ribbing, seed stitch or garter stitch.
Buttonholes The type of hole (vertical, horizontal, eyelet) needs to work with the stitch pattern. Make sure you can center your buttonhole within the stitch pattern.
Example - A 5-stitch buttonhole cannot be centered in a 2x2 Rib, so either use a 4-stitch buttonhole or use a different stitch pattern for the band. If you’re going to place the center of the buttonhole in the purl ditch (which is advisable since it’s less obvious) 2x2 Rib becomes the most restrictive since you’re working in multiples of 4. Before continuing, think about the type of buttonhole you wish to use, how many stitches it uses, and how it works with your stitch pattern.
Balancing the Stitch Pattern by beginning and ending on the same stitch, especially if your band is worked as one long, contiguous band that begins at the bottom of the left front, continues around the neck, and ends at the bottom of the right front. By beginning and ending with the same stitch, the stitch patterns of each left and right fronts will align.

Seed Stitch looks uniform and can be a multiple of 2 for an even number of stitches or 2 + 1 for an odd number of stitches. Garter can be any number of stitches and is the simplest to calculate since there is no multiple, but it may create a wavy band.
Balancing a stitch pattern on paper doesn’t always work with real-life knitting. The first and last stitch tend to curl under. There’s no point in fighting this one. No matter how well you block, it will curl under when worn.
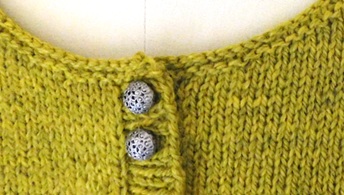
In the below left photo, a 2x2 Rib was worked as *K2, p2; rep from to last 2 sts, k2 which is balanced on paper, but when you look closely at the band edges, you see k1 on each end and not k2.


Solution: Add one stitch to each end. The 2x2 Rib now becomes a multiple of 4 sts + 4 and is written as: K1, *k2, p2; rep from to last 3 sts, k3 however you don’t see the k3 at each end. You see k2 and the pattern now looks uniform.
Width of Band The width of the band should complement the thickness and stitch pattern of the garment, and size of the buttons.
Pair
a fine yarn + delicate lace pattern + thin band + small buttons
or a bulky yarn + cables + wide band + large buttons
The button should sit in the middle of the band and not extend beyond, nor appear tiny in comparison. On average, bands tend to be 1-2” wide, but can be up to 3-4” for oversized buttons.
The width of the band does not need to match the depth of your bottom ribbing. It’s common to see a deeper hem, example; 4” hem with 2” wide button band.
Placement of Buttonhole Within Width of Band
Center the buttonhole: when picking up stitches after the garment is knit and forming horizontal buttonholes in the band, or if you’re forming vertical holes as you knit the garment and bands at the same time, the hole looks like (A) so in this case, center the hole within the button band.
A B C
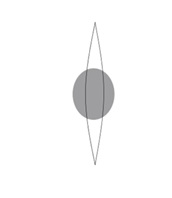
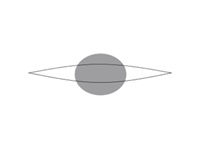

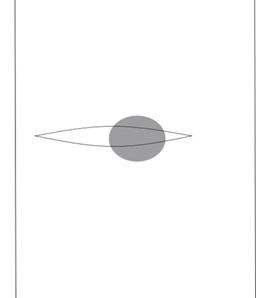
Do not center buttonhole: if you’re working bands at the same time as the body and creating a horizontal buttonhole, or if you’ve picked up stitches at the end and are creating a vertical buttonhole, the hole looks like (B) so in this case, avoid centering the hole. The reason is that a button may be centered when lying flat, but when worn, the band will pull until the button stops it, which causes the band underneath to peek through (C).
If you want your button to sit in the middle of the band when the garment is worn, move your hole towards the body, so the edge of the hole lies a stitch or two beyond the center which allows the button to remain centered in the band when worn, and conceals the band underneath. When the hole is closer to the sturdy edge, where the band meets the fabric of the sweater, the band won’t bulge as much either.
Vertical Placement of Buttonholes Knitters today expect patterns to included written, detailed instructions for the bands. This means designers need to calculate exactly how many stitches to work below the bottom hole, above the top hole, how many stitches are used for the hole itself, and between each hole.
This can be challenging when grading a pattern across multiple sizes, each with different band lengths. This is one area where you really want to work out the placement of each hole in your grading worksheet before continuing, because if your numbers aren’t adding up, you can make changes before getting too far along. You do not want to design one size, knit it, then grade it across other sizes, because vertical placement issues will show up in your grading worksheet and are best fixed before finishing the band design.
Decide how many buttons you want. The smaller the button, the more you’ll need. If you’re designing a close-fitting garment, use more buttons to prevent gaping. If the garment has lots of ease, and there will be no tension on the band, you can use fewer, larger buttons to achieve the look you wish. Tiny buttons can be spaced 1” apart, but the average is about 2 – 2.5” apart for medium sized buttons and 3 – 3.5” apart for larger buttons.
Visualize on paper or your schematic your layout starting with the most important button - the apex of bust. If you’ve ever seen a top with a button just above and just below the fullest part of the bust, and the top gaps open at the bustline, you understand what I mean. With form-fitting sweaters, this is crucial. With oversized cardigans with generous ease, it isn’t.
The top button needs to sit close to the top without bulging out over the band so you'll want to leave ½” to ¾” above the top button. The fabric should extend above the top button just slightly to prevent the button from rising above the top edge, but not so much that it’s flopping over the top. Think about what is happening to the neckline too. If the button band runs to the top, allowing a few stitches above the top hole should be fine (A).
A B C


The bottom button has more flexibility. You can leave ¾”, 1”, 2”, 3”, 4” from bottom edge of garment to bottom button and it all works. You can place buttons only on top portion and leave bottom open. For long garments, consider leaving bottom 3-5” unbuttoned space for movement (B).
Now that you have visualized the apex button, top and bottom buttons, it’s time to space the rest. When spacing holes, don’t rely on just the same number of stitches between each hole, focus on using the same number of repeats (C) between each. Use your swatch to visualize the number of repeats of the pattern you want.
Spacing Buttons Using a Spreadsheet In order to calculate vertical placement using your grading worksheet, you’ll need to estimate how many buttons you want to use, know how long your button band is, and the multiples of the band stitch pattern. All of this can change, but we need someplace to start.
Your Goals:
Have the same number of stitches between each hole
Allow the stitch pattern repeat to be worked fully and identically between each hole
Allow the stitch pattern to begin and end on the same stitch which means the button hole begins and ends on the same stitch which makes forming holes easier
Convert the area of your buttons to stitches based on your band stitch pattern. The area of your buttons is usually from the bottom of the garment to the beginning of your neck shaping which can be near the throat for a fully-buttoned cardigan or near the bottom of the armholes for a V-neck cardigan. Multiply this length by the stitch gauge of your band for the number of stitches.
Estimate how many stitches you want above the top hole. If your top button falls where the armholes begin in a V-neck cardigan, you’ll have lots of button band above this so the top button isn’t as crucial. In this case you’ll select zero stitches above the top hole, since you want to continue with your pattern after the hole is formed. If your top button reaches close to the neck and you have a very trim neck finishing above it, you may want 2-3 stitches above the hole. You’ll need enough stitches to prevent the button from extending beyond the band.
Figure out how many stitches your buttonhole uses. Some buttonholes are easy to calculate. A yarn over buttonhole that is worked by: k2tog, yo, ssk, uses 4 sts (2 from the k2tog and 2 from the ssk). Some buttonholes are trickier especially the one-row buttonholes where you’re slipping a stitch from the left to the right needle, then slipping it back. To test how many stitches your buttonhole uses,
swatch the band stitch pattern and write down # of stitches in 1 row
place a safety pin on the last stitch worked before starting your hole
work hole completely
place a safety pin on the next stitch
count how many stitches remain before and after the hole, including those marked
subtract from total number of stitches to find out how many stitches are used in the hole
Set up your spreadsheets - designers can set up grading spreadsheets any way that is logical. There is no one correct way to do this. Do what works for you. The below example is worked in1x1 Rib is just one way to set this up and is shown as a guide to what information you'll need:

After entering your known information, set up formulas to calculate the rest. The goal is to have an even, whole number of stitches between holes on the last line.
Focus on the number of spaces or sections between the buttons. This is where you need to evenly distribute the stitches. If you have 8 buttons, there will be 7 spaces or sections between the buttons.
If your numbers aren’t coming out nice and neat as whole, even numbers, the circled areas below can be easily changed:

Spreadsheet goals:
Have the same number of stitches between each hole per size. (Different sizes can have different numbers of stitches between the holes, but within one size, for example, the size 36”, you wouldn’t want 14 stitches between the first and second button hole, then 16 stitches between the second and third button hole.)
Allow stitch pattern repeat to be worked fully & identically between each hole.
Allow stitch pattern to begin and end on the same stitch (which means each button hole begins and ends on the same stitch).
Button Size I find it easier to design the size of the hole first, write the button band instructions for all sizes, and after knitting the sample, use stash buttons of different sizes to see which size fits best. With a ruler measure the width of the button and now you can safely put this measurement in your pattern. But if you have a certain button you want to use, and you are able to design a hole around this button that works with your spreadsheet, then feel free to go about it this way.
Which Side to Place Buttons? Traditionally, women’s and girl’s buttonholes go on the right front (as the garment is worn). Men’s and boy’s buttonholes go on the left front. But you can design buttonholes to go on whichever side you want. This distinction is fading out of fashion.
A well-designed button band successfully closes a garment and looks neat and uniform. If the designer has done all of the heavy lifting by calculating stitches for and between each hole, even a newer knitter can successfully knit a button band to be proud of, as long as their stitch and row gauge is correct, which is the basis for the success of most any garment.
If you like fully buttoned bands, look at patterns for Melk Abbey, Lido Cardigan, Elixir.
If you're ready to take designing to the next level, I teach a Certified Professional Knitwear Designer program through TKGA. Information and enrollment can be found here: https://tkga.org/knitwear-designer-certification/
References
Newton, Deborah. Designing Knitwear, Newtown, CT: The Taunton Press, 1992.
Newton, Deborah. Finishing School, Master Class for Knitters, New York, NY: Sixth & Spring Books, 2011.


Comments