
Master Class: Picking up Stitches
- Donna Estin

- May 4, 2021
- 6 min read
Knitting patterns often tell us to pick up stitches but never tell us how. If you pick up a stitch in the right place, at the right interval, your knitting will look polished and professionally finished, but a poor pick up can cause uneven additions that don’t fit well with the main body of knitting.
Stitches are picked up along an edge of knitting when you want to knit a supplemental piece to the body. This is done for neckbands, cardigan front bands, edges of a rectangular shawl, and armholes as examples.
Our goal when picking up stitches is to have each piece of fabric lie flat. The main body should not become distorted by the addition. And the addition should not be wavy or stretched. They both should lie flat and look as one piece of fabric. What to look for as you’re inserting your needle and picking up a stitch:
Make sure the join between the picked up stitches and the edge is even
That the stitches are lined up properly
There are no holes
There are no distorted stitches
There are 3 edges that you can pick up stitches. Horizontal, Vertical and Diagonal.

On horizontal edges, avoid inserting your needle in between stitches, resulting in the dreaded 11’s. This pulls stitches together and creates a line of 11’s across the edge of your fabric.

The correct way to pick up stitches on a horizontal edge, is to insert your needle into the center of the stitch, or the center of the V. For the first stitch, this column of first stitches will always be wobbly looking. Insert needle into the center, just below the bind off edge. If you mistakenly go into the row below, you’ll end up with a thick seam which can be visible on narrowly trimmed necklines and unnecessarily thick. So you want to go through the stitch that lies just under the BO edge.
You can see in the picture below left, how the stitches from the main lighter section of knitting run continuously and uninterrupted into the new, darker section.

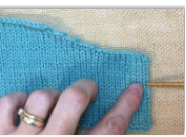
On vertical edges, like with cardigan bands or edges of a rectangular shawl, you are moving up the piece vertically, like in the photo above right, instead from side to side horizontally. With vertical edges, insert the needle tip between the first stitch (selvedge stitch) and second stitch, picking up the whole selvedge stitch (both strands). This places the first column of stitches to the wrong side of the pick ups as if it were a seam. The second column of stitches now becomes the first column of stitches that you see.
To start, turn your work to the side with the vertical edge lying horizontally at the top. Insert needle into the first hole above the CO edge and pull through a loop, between the first and second stitch. Go into the next hole, under both legs of the stitch. Each stitch has two legs and you’re picking up both. If you go through just the outer leg you’ll end up with an extra column of half stitches which you don’t want. If you go trough just the inner edge your selvedge won’t be as stable and can pull out of shape. Unless the pattern specifically tells you to do this, for various reasons, go under the whole stitch.
For diagonal edges, you’ll insert the needle in one of the two methods we’ve already gone over. The method you choose depends on how your diagonal edge was created. If it was made by using decreases to create the curve, pick up stitches as for vertical edges. Decreases are when a pattern tells you for example to work to 3 sts before the neck opening, k2tog, k1. Or to k1, ssk, knit to end. No stitches are bound off. You’re just decreasing one stitch at a time.
With diagonal edges that were bound off to create the curve, you’ll pick up stitches as for horizontal. This would be when pattern tells you to BO 3 sts at the beg of the next 2 rows, BO 2 sts at the beg of the next 2 rows, BO 1 st at the beg of the next 2 rows. This creates a diagonal line that resembles stair steps.

When moving from one step up to the next, avoid the hole or space between the two. Take your needle into the center of the next stitch and up a row. It seems like a big jump. If you go into the hole you’ll just make it bigger. Go to the next stitch and follow it up and insert needle into the top, just under the BO edge. You’ll see it forms an even diagonal and the stair steps have disappeared. It looks like an even slant with each new stitch continuing from the old stitch.
Now that we know how and where to insert the needle, we need to figure out how many stitches to pick up and how often. If we pick up too many stitches, our addition will flare out; too few and the band draws in.
For a horizontal edge, pick up one stitch for every bound off stitch. This allows you to stack another row of stitches on top of what you’ve already knit your column of stitches will run continuously across the line of pick ups.
Figuring how many stitches to pick up along a vertical edge is a little trickier. This is because in most stitch patterns, the number of stitches per inch is less than the number of rows per inch. We figure out exactly how many stitches by calculating pickup ratio using the ROW gauge of the body and the STITCH gauge of the edging.
I’m going to show you three different ways to figure the ratio. Pick your favorite. Some work better than others depending on your gauge numbers so it's good to know different ways to calculate.
Option 1 (Totals): First count your rows. Next figure out how many stitches to pick up. A pattern usually tells you this but I recommend doing it yourself since this is your knitting. The only way you’ll get the same results as the pattern is if you’re knitting with the exact stitch gauge, exact row gauge and to the exact length as the pattern. To figure it out yourself, multiply the stitch gauge of the addition by the distance.
Rows - stitches = # of rows to skip. Example: we count 105 rows in a 15" band. Our stitch gauge is 6 sts to 1" so 15"x6 sts = 90 sts. 105 rows - 90 stitches= 15 extra rows. We need to skip 15 rows during our pick ups. To find the exact ratio, divide larger # (105) by # of rows to skip (15) and we find out that we need to skip every 7th row 15 times. Pick up one stitch for one row 6 times, skip the 7th row, then pick up one stitch for one row another 6 times, skip the next row, and so on.
Option 2 (Gauge over 4"):
Determine row gauge of body (Ex: 27 rows = 4”)
Determine stitch gauge of addition (Ex: 20 sts = 4”)
20 sts & 27 rows = 4”. 20 ÷ 27= 0.74 converted to a fraction is 3/4 , we’re rounding up. So pick up 3 sts for every 4 rows.
Option 3 (Gauge over 1"):
Determine row gauge of body (Ex: 7 rows = 1”)
Determine stitch gauge of addition (Ex: 6 sts = 1”)
Pick up 6 sts for every 7 rows. Pick up 1 stitch per 1 row 6 times, then skip the 7th row.
In all three options, whether you’re working with your total number of rows and total number of stitches, or working with gauge over 1” or gauge over 4”, you’re doing the same thing. You’re figuring out how to space the lower number of stitches for your addition across a larger number of rows on your main body of knitting. It’s up to you which method you choose, but the end result is the same.
Diagonal pick ups are calculated the same was as Vertical pick ups. Curved edges, like necklines, are usually a combination of all three. A neckline is usually formed by binding off the center stitches, then decreasing or binding off 1 stitch at a time to create a gradual slant, then working straight for an inch or so.
Final thoughts:
When picking up stitches, a ridge will form on the opposite side. If you want your ridge to appear on the wrong side, pick up stitches with the right side facing. If you are picking up stitches around a neck that will be visible (fold-over collar that exposes the area around the neck), you’ll want to pick up stitches with the wrong side facing so the ridge appears on right side of fabric and is hidden when collar is folded over.
Thank you for visiting DonnaEstin.com and have fun picking up stitches on your next project.
References:
Buss, Katharina. Big Book of Knitting. New York, NY: Sterling Publishing Co., 2001.
Hemmons Hiatt, June. The Principles of Knitting. New York, NY: Simon & Schuster, 1988.
Newton, Deborah. Finishing School, Master Class for Knitters. New York, NY: Sixth & Spring Books, 2011.
Paden, Shirley. Knitwear Design Workshop. Loveland, CO: Interweave Press, LLC, 2009.


Comments